
![]() Upload new photo
for Byron Bay - The Wreck
|
for another surf break
Upload new photo
for Byron Bay - The Wreck
|
for another surf break
| 3 hours earlier |
Peak Waves | Wind | Wind Waves | Swell 1 | Swell 2 | 3 hours later |
|---|---|---|---|---|---|---|
|
ESE |
NW |
N |
N |
ESE |
||
| 10 s | cross | 6 s | 6 s | 10 s |
Open ocean wave model on 19 December at 10 am
Forecast wind and swell just offshore from Byron Bay - The Wreck around the time the photo was taken
| 3 hours earlier |
Peak Waves | Wind | Wind Waves | Swell 1 | Swell 2 | 3 hours later |
|---|---|---|---|---|---|---|
|
ESE |
NNE |
N |
ESE |
|||
| 10 s | on | 6 s | 10 s |
Open ocean wave model on 19 December at 1 pm
Forecast wind and swell just offshore from Byron Bay - The Wreck around the time the photo was taken
| 3 hours earlier |
Peak Waves | Wind | Wind Waves | Swell 1 | Swell 2 | 3 hours later |
|---|---|---|---|---|---|---|
|
SE |
ESE |
S |
NNE |
ESE |
||
| 10 s | cross | 6 s | 6 s | 9 s |
Open ocean wave model on 19 December at 4 pm
Forecast wind and swell just offshore from Byron Bay - The Wreck around the time the photo was taken
| 3 hours earlier |
Peak Waves | Wind | Wind Waves | Swell 1 | Swell 2 | 3 hours later |
|---|---|---|---|---|---|---|
|
SE |
SSE |
S |
NNE |
ESE |
||
| 9 s |
cross- off |
6 s | 5 s | 9 s |
Open ocean wave model on 19 December at 7 pm
Forecast wind and swell just offshore from Byron Bay - The Wreck around the time the photo was taken
| 3 hours earlier |
Peak Waves | Wind | Wind Waves | Swell 1 | Swell 2 | 3 hours later |
|---|---|---|---|---|---|---|
|
S |
SSE |
S |
ESE |
NNE |
||
| 7 s |
cross- off |
7 s | 9 s | 5 s |
Open ocean wave model on 19 December at 10 pm
Forecast wind and swell just offshore from Byron Bay - The Wreck around the time the photo was taken
| 3 hours earlier |
Peak Waves | Wind | Wind Waves | Swell 1 | Swell 2 | 3 hours later |
|---|---|---|---|---|---|---|
|
S |
SSE |
S |
ESE |
NNE |
||
| 7 s |
cross- off |
7 s | 9 s | 5 s |
Open ocean wave model on 20 December at 1 am
Forecast wind and swell just offshore from Byron Bay - The Wreck around the time the photo was taken
| 3 hours earlier |
Peak Waves | Wind | Wind Waves | Swell 1 | Swell 2 | 3 hours later |
|---|---|---|---|---|---|---|
|
S |
SSE |
S |
ESE |
NNE |
||
| 7 s |
cross- off |
7 s | 9 s | 5 s |
Open ocean wave model on 20 December at 4 am
Forecast wind and swell just offshore from Byron Bay - The Wreck around the time the photo was taken
| 3 hours earlier |
Peak Waves | Wind | Wind Waves | Swell 1 | Swell 2 | 3 hours later |
|---|---|---|---|---|---|---|
|
S |
SSE |
SSE |
N |
NE |
||
| 7 s |
cross- off |
7 s | 5 s | 4 s |
Open ocean wave model on 20 December at 7 am
Forecast wind and swell just offshore from Byron Bay - The Wreck around the time the photo was taken
| 3 hours earlier |
Peak Waves | Wind | Wind Waves | Swell 1 | Swell 2 | 3 hours later |
|---|---|---|---|---|---|---|
|
S |
SE |
SSE |
N |
NE |
||
| 7 s |
cross- off |
7 s | 5 s | 14 s |
Open ocean wave model on 20 December at 10 am
Forecast wind and swell just offshore from Byron Bay - The Wreck around the time the photo was taken
| 3 hours earlier |
Peak Waves | Wind | Wind Waves | Swell 1 | Swell 2 | 3 hours later |
|---|---|---|---|---|---|---|
|
S |
SE |
SSE |
ESE |
N |
||
| 7 s |
cross- off |
7 s | 9 s | 5 s |
Open ocean wave model on 20 December at 1 pm
Forecast wind and swell just offshore from Byron Bay - The Wreck around the time the photo was taken
| 3 hours earlier |
Peak Waves | Wind | Wind Waves | Swell 1 | Swell 2 | 3 hours later |
|---|---|---|---|---|---|---|
|
S |
SE |
SSE |
ESE |
E |
||
| 8 s |
cross- off |
7 s | 9 s | 9 s |
Open ocean wave model on 20 December at 4 pm
Forecast wind and swell just offshore from Byron Bay - The Wreck around the time the photo was taken
| 3 hours earlier |
Peak Waves | Wind | Wind Waves | Swell 1 | Swell 2 | 3 hours later |
|---|---|---|---|---|---|---|
|
S |
ESE |
SSE |
ESE |
NNE |
||
| 8 s |
cross- off |
7 s | 9 s | 17 s |
Open ocean wave model on 20 December at 7 pm
Forecast wind and swell just offshore from Byron Bay - The Wreck around the time the photo was taken
| 3 hours earlier |
Peak Waves | Wind | Wind Waves | Swell 1 | Swell 2 | 3 hours later |
|---|---|---|---|---|---|---|
|
S |
ESE |
SSE |
ESE |
NE |
||
| 8 s | cross | 7 s | 9 s | 14 s |
Open ocean wave model on 20 December at 10 pm
Forecast wind and swell just offshore from Byron Bay - The Wreck around the time the photo was taken
| 3 hours earlier |
Peak Waves | Wind | Wind Waves | Swell 1 | Swell 2 | 3 hours later |
|---|---|---|---|---|---|---|
|
S |
ESE |
SSE |
ESE |
|||
| 9 s | cross | 8 s | 9 s |
Open ocean wave model on 21 December at 1 am
Forecast wind and swell just offshore from Byron Bay - The Wreck around the time the photo was taken
| 3 hours earlier |
Peak Waves | Wind | Wind Waves | Swell 1 | Swell 2 | 3 hours later |
|---|---|---|---|---|---|---|
|
SSE |
E |
ESE |
S |
ESE |
||
| 9 s |
cross- on |
5 s | 9 s | 9 s |
Open ocean wave model on 21 December at 4 am
Forecast wind and swell just offshore from Byron Bay - The Wreck around the time the photo was taken
| 3 hours earlier |
Peak Waves | Wind | Wind Waves | Swell 1 | Swell 2 | 3 hours later |
|---|---|---|---|---|---|---|
|
S |
E |
ESE |
SSE |
ESE |
||
| 9 s | cross | 5 s | 8 s | 9 s |
Open ocean wave model on 21 December at 7 am
Forecast wind and swell just offshore from Byron Bay - The Wreck around the time the photo was taken
| 3 hours earlier |
Peak Waves | Wind | Wind Waves | Swell 1 | Swell 2 | 3 hours later |
|---|---|---|---|---|---|---|
|
SSE |
E |
E |
S |
ESE |
||
| 9 s | cross | 4 s | 8 s | 5 s |
Open ocean wave model on 21 December at 10 am
Forecast wind and swell just offshore from Byron Bay - The Wreck around the time the photo was taken
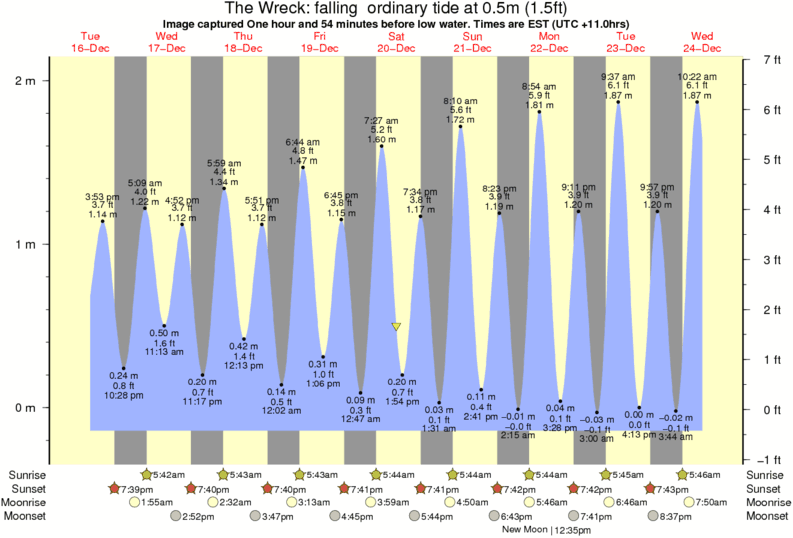
Image captured One hour and 54 minutes before low water (falling ordinary tide). Tide height was 0.5m (1.5 ft). Range 2.08m (6.8 ft). Toggle tide graph

Byron Bay - The Wreck Surf Photo: 'Clean, Empty & Unridden' by Milan Gruenfeld
Another great afternoon in Byron
 Nearest