
![]() Upload new photo
for Triggs Beach Adelaide
|
for another surf break
Upload new photo
for Triggs Beach Adelaide
|
for another surf break
| 3 hours earlier |
Peak Waves | Wind | Wind Waves | Swell 1 | Swell 2 | 3 hours later |
|---|---|---|---|---|---|---|
|
SSE |
SSE |
SSE |
S |
WSW |
||
| 7 s |
cross- off |
7 s | 14 s | 7 s |
Open ocean wave model on 22 March at 3 pm
Forecast wind and swell just offshore from Triggs Beach Adelaide around the time the photo was taken
| 3 hours earlier |
Peak Waves | Wind | Wind Waves | Swell 1 | Swell 2 | 3 hours later |
|---|---|---|---|---|---|---|
|
SSE |
SSE |
SSE |
S |
WSW |
||
| 4 s |
cross- off |
4 s | 14 s | 7 s |
Open ocean wave model on 22 March at 6 pm
Forecast wind and swell just offshore from Triggs Beach Adelaide around the time the photo was taken
| 3 hours earlier |
Peak Waves | Wind | Wind Waves | Swell 1 | Swell 2 | 3 hours later |
|---|---|---|---|---|---|---|
|
SSE |
SSE |
SSE |
S |
WSW |
||
| 4 s |
cross- off |
4 s | 14 s | 7 s |
Open ocean wave model on 22 March at 9 pm
Forecast wind and swell just offshore from Triggs Beach Adelaide around the time the photo was taken
| 3 hours earlier |
Peak Waves | Wind | Wind Waves | Swell 1 | Swell 2 | 3 hours later |
|---|---|---|---|---|---|---|
|
SSE |
S |
SSE |
S |
WSW |
||
| 4 s | cross | 4 s | 14 s | 7 s |
Open ocean wave model on 23 March at 12 am
Forecast wind and swell just offshore from Triggs Beach Adelaide around the time the photo was taken
| 3 hours earlier |
Peak Waves | Wind | Wind Waves | Swell 1 | Swell 2 | 3 hours later |
|---|---|---|---|---|---|---|
|
SSE |
SSE |
SSE |
S |
WSW |
||
| 3 s |
cross- off |
3 s | 13 s | 7 s |
Open ocean wave model on 23 March at 3 am
Forecast wind and swell just offshore from Triggs Beach Adelaide around the time the photo was taken
| 3 hours earlier |
Peak Waves | Wind | Wind Waves | Swell 1 | Swell 2 | 3 hours later |
|---|---|---|---|---|---|---|
|
SSE |
S |
SSE |
S |
WSW |
||
| 4 s | cross | 4 s | 13 s | 7 s |
Open ocean wave model on 23 March at 6 am
Forecast wind and swell just offshore from Triggs Beach Adelaide around the time the photo was taken
| 3 hours earlier |
Peak Waves | Wind | Wind Waves | Swell 1 | Swell 2 | 3 hours later |
|---|---|---|---|---|---|---|
|
SSE |
S |
SSE |
SSE |
S |
||
| 4 s | cross | 4 s | 7 s | 13 s |
Open ocean wave model on 23 March at 9 am
Forecast wind and swell just offshore from Triggs Beach Adelaide around the time the photo was taken
| 3 hours earlier |
Peak Waves | Wind | Wind Waves | Swell 1 | Swell 2 | 3 hours later |
|---|---|---|---|---|---|---|
|
SSE |
S |
S |
SSE |
S |
||
| 4 s | cross | 4 s | 7 s | 13 s |
Open ocean wave model on 23 March at 12 pm
Forecast wind and swell just offshore from Triggs Beach Adelaide around the time the photo was taken
| 3 hours earlier |
Peak Waves | Wind | Wind Waves | Swell 1 | Swell 2 | 3 hours later |
|---|---|---|---|---|---|---|
|
S |
S |
S |
S |
WSW |
||
| 3 s | cross | 3 s | 13 s | 7 s |
Open ocean wave model on 23 March at 3 pm
Forecast wind and swell just offshore from Triggs Beach Adelaide around the time the photo was taken
| 3 hours earlier |
Peak Waves | Wind | Wind Waves | Swell 1 | Swell 2 | 3 hours later |
|---|---|---|---|---|---|---|
|
S |
S |
S |
S |
WSW |
||
| 3 s | cross | 3 s | 13 s | 7 s |
Open ocean wave model on 23 March at 6 pm
Forecast wind and swell just offshore from Triggs Beach Adelaide around the time the photo was taken
| 3 hours earlier |
Peak Waves | Wind | Wind Waves | Swell 1 | Swell 2 | 3 hours later |
|---|---|---|---|---|---|---|
|
S |
S |
S |
SSE |
S |
||
| 4 s | cross | 4 s | 6 s | 15 s |
Open ocean wave model on 23 March at 9 pm
Forecast wind and swell just offshore from Triggs Beach Adelaide around the time the photo was taken
| 3 hours earlier |
Peak Waves | Wind | Wind Waves | Swell 1 | Swell 2 | 3 hours later |
|---|---|---|---|---|---|---|
|
S |
SSW |
S |
SSE |
S |
||
| 4 s |
cross- on |
4 s | 6 s | 14 s |
Open ocean wave model on 24 March at 12 am
Forecast wind and swell just offshore from Triggs Beach Adelaide around the time the photo was taken
| 3 hours earlier |
Peak Waves | Wind | Wind Waves | Swell 1 | Swell 2 | 3 hours later |
|---|---|---|---|---|---|---|
|
SSW |
SW |
SW |
SSE |
S |
||
| 3 s |
cross- on |
3 s | 6 s | 14 s |
Open ocean wave model on 24 March at 3 am
Forecast wind and swell just offshore from Triggs Beach Adelaide around the time the photo was taken
| 3 hours earlier |
Peak Waves | Wind | Wind Waves | Swell 1 | Swell 2 | 3 hours later |
|---|---|---|---|---|---|---|
|
SSW |
SSW |
SSW |
S |
WSW |
||
| 3 s | cross | 3 s | 14 s | 5 s |
Open ocean wave model on 24 March at 6 am
Forecast wind and swell just offshore from Triggs Beach Adelaide around the time the photo was taken
| 3 hours earlier |
Peak Waves | Wind | Wind Waves | Swell 1 | Swell 2 | 3 hours later |
|---|---|---|---|---|---|---|
|
S |
SSE |
S |
S |
WSW |
||
| 3 s |
cross- off |
3 s | 14 s | 6 s |
Open ocean wave model on 24 March at 9 am
Forecast wind and swell just offshore from Triggs Beach Adelaide around the time the photo was taken
| 3 hours earlier |
Peak Waves | Wind | Wind Waves | Swell 1 | Swell 2 | 3 hours later |
|---|---|---|---|---|---|---|
|
S |
SSE |
SSE |
S |
WSW |
||
| 4 s |
cross- off |
3 s | 14 s | 6 s |
Open ocean wave model on 24 March at 12 pm
Forecast wind and swell just offshore from Triggs Beach Adelaide around the time the photo was taken
| 3 hours earlier |
Peak Waves | Wind | Wind Waves | Swell 1 | Swell 2 | 3 hours later |
|---|---|---|---|---|---|---|
|
SSE |
SSE |
SSE |
WSW |
S |
||
| 4 s |
cross- off |
4 s | 5 s | 14 s |
Open ocean wave model on 24 March at 3 pm
Forecast wind and swell just offshore from Triggs Beach Adelaide around the time the photo was taken
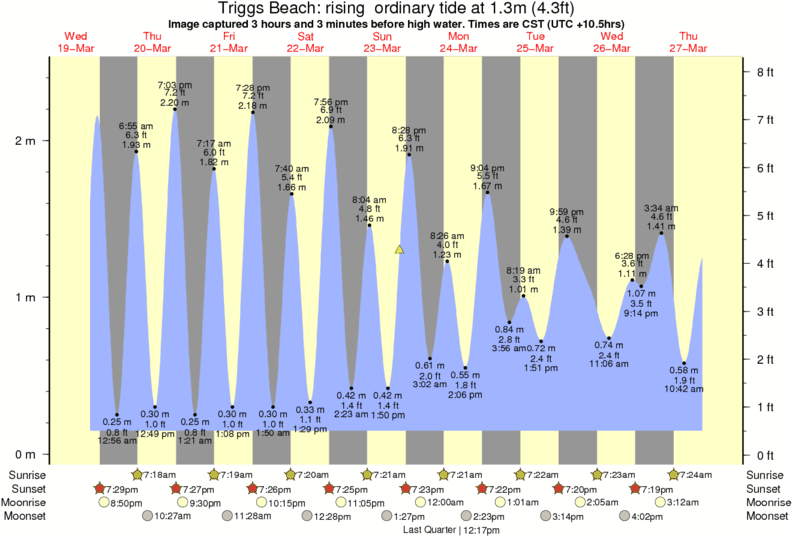
Image captured 3 hours and 3 minutes before high water (rising ordinary tide). Tide height was 1.3m (4.3 ft). Range 2.17m (7.1 ft). Toggle tide graph

Triggs Beach Adelaide Surf Photo: 'Flying Mermaid' by Flynn Ironmonger
Surfer Annalise Meakins having a swim
 Nearest