
![]() Upload new photo
for Bovisand Bay
|
for another surf break
Upload new photo
for Bovisand Bay
|
for another surf break
| 3 hours earlier |
Peak Waves | Wind | Wind Waves | Swell 1 | Swell 2 | 3 hours later |
|---|---|---|---|---|---|---|
|
WSW |
SW |
WSW |
||||
| 12 s | on | 12 s |
Open ocean wave model on 18 September at 6 pm
Forecast wind and swell just offshore from Bovisand Bay around the time the photo was taken
| 3 hours earlier |
Peak Waves | Wind | Wind Waves | Swell 1 | Swell 2 | 3 hours later |
|---|---|---|---|---|---|---|
|
WSW |
SSW |
WSW |
WSW |
|||
| 12 s | on | 12 s | 12 s |
Open ocean wave model on 18 September at 9 pm
Forecast wind and swell just offshore from Bovisand Bay around the time the photo was taken
| 3 hours earlier |
Peak Waves | Wind | Wind Waves | Swell 1 | Swell 2 | 3 hours later |
|---|---|---|---|---|---|---|
|
WSW |
SW |
WSW |
||||
| 11 s | on | 11 s |
Open ocean wave model on 19 September at 12 am
Forecast wind and swell just offshore from Bovisand Bay around the time the photo was taken
| 3 hours earlier |
Peak Waves | Wind | Wind Waves | Swell 1 | Swell 2 | 3 hours later |
|---|---|---|---|---|---|---|
|
WSW |
SW |
WSW |
||||
| 11 s | on | 11 s |
Open ocean wave model on 19 September at 3 am
Forecast wind and swell just offshore from Bovisand Bay around the time the photo was taken
| 3 hours earlier |
Peak Waves | Wind | Wind Waves | Swell 1 | Swell 2 | 3 hours later |
|---|---|---|---|---|---|---|
|
WSW |
SW |
WSW |
||||
| 10 s | on | 10 s |
Open ocean wave model on 19 September at 6 am
Forecast wind and swell just offshore from Bovisand Bay around the time the photo was taken
| 3 hours earlier |
Peak Waves | Wind | Wind Waves | Swell 1 | Swell 2 | 3 hours later |
|---|---|---|---|---|---|---|
|
WSW |
SW |
SW |
||||
| 9 s | on | 9 s |
Open ocean wave model on 19 September at 9 am
Forecast wind and swell just offshore from Bovisand Bay around the time the photo was taken
| 3 hours earlier |
Peak Waves | Wind | Wind Waves | Swell 1 | Swell 2 | 3 hours later |
|---|---|---|---|---|---|---|
|
WSW |
SW |
WSW |
||||
| 8 s | on | 8 s |
Open ocean wave model on 19 September at 12 pm
Forecast wind and swell just offshore from Bovisand Bay around the time the photo was taken
| 3 hours earlier |
Peak Waves | Wind | Wind Waves | Swell 1 | Swell 2 | 3 hours later |
|---|---|---|---|---|---|---|
|
WSW |
SW |
WSW |
||||
| 9 s | on | 9 s |
Open ocean wave model on 19 September at 3 pm
Forecast wind and swell just offshore from Bovisand Bay around the time the photo was taken
| 3 hours earlier |
Peak Waves | Wind | Wind Waves | Swell 1 | Swell 2 | 3 hours later |
|---|---|---|---|---|---|---|
|
W |
SW |
WSW |
||||
| 10 s | on | 10 s |
Open ocean wave model on 19 September at 6 pm
Forecast wind and swell just offshore from Bovisand Bay around the time the photo was taken
| 3 hours earlier |
Peak Waves | Wind | Wind Waves | Swell 1 | Swell 2 | 3 hours later |
|---|---|---|---|---|---|---|
|
W |
SW |
WSW |
||||
| 11 s | on | 11 s |
Open ocean wave model on 19 September at 9 pm
Forecast wind and swell just offshore from Bovisand Bay around the time the photo was taken
| 3 hours earlier |
Peak Waves | Wind | Wind Waves | Swell 1 | Swell 2 | 3 hours later |
|---|---|---|---|---|---|---|
|
W |
SW |
WSW |
W |
|||
| 12 s | on | 12 s | 11 s |
Open ocean wave model on 20 September at 12 am
Forecast wind and swell just offshore from Bovisand Bay around the time the photo was taken
| 3 hours earlier |
Peak Waves | Wind | Wind Waves | Swell 1 | Swell 2 | 3 hours later |
|---|---|---|---|---|---|---|
|
W |
SW |
SW |
W |
|||
| 12 s | on | 6 s | 12 s |
Open ocean wave model on 20 September at 3 am
Forecast wind and swell just offshore from Bovisand Bay around the time the photo was taken
| 3 hours earlier |
Peak Waves | Wind | Wind Waves | Swell 1 | Swell 2 | 3 hours later |
|---|---|---|---|---|---|---|
|
W |
SW |
SW |
W |
|||
| 11 s | on | 6 s | 11 s |
Open ocean wave model on 20 September at 6 am
Forecast wind and swell just offshore from Bovisand Bay around the time the photo was taken
| 3 hours earlier |
Peak Waves | Wind | Wind Waves | Swell 1 | Swell 2 | 3 hours later |
|---|---|---|---|---|---|---|
|
W |
SSW |
WSW |
||||
| 11 s | on | 11 s |
Open ocean wave model on 20 September at 9 am
Forecast wind and swell just offshore from Bovisand Bay around the time the photo was taken
| 3 hours earlier |
Peak Waves | Wind | Wind Waves | Swell 1 | Swell 2 | 3 hours later |
|---|---|---|---|---|---|---|
|
W |
SSW |
WSW |
||||
| 11 s | on | 11 s |
Open ocean wave model on 20 September at 12 pm
Forecast wind and swell just offshore from Bovisand Bay around the time the photo was taken
| 3 hours earlier |
Peak Waves | Wind | Wind Waves | Swell 1 | Swell 2 | 3 hours later |
|---|---|---|---|---|---|---|
|
WSW |
SSW |
SW |
||||
| 8 s | on | 8 s |
Open ocean wave model on 20 September at 3 pm
Forecast wind and swell just offshore from Bovisand Bay around the time the photo was taken
| 3 hours earlier |
Peak Waves | Wind | Wind Waves | Swell 1 | Swell 2 | 3 hours later |
|---|---|---|---|---|---|---|
|
WSW |
SW |
SW |
||||
| 9 s | on | 9 s |
Open ocean wave model on 20 September at 6 pm
Forecast wind and swell just offshore from Bovisand Bay around the time the photo was taken
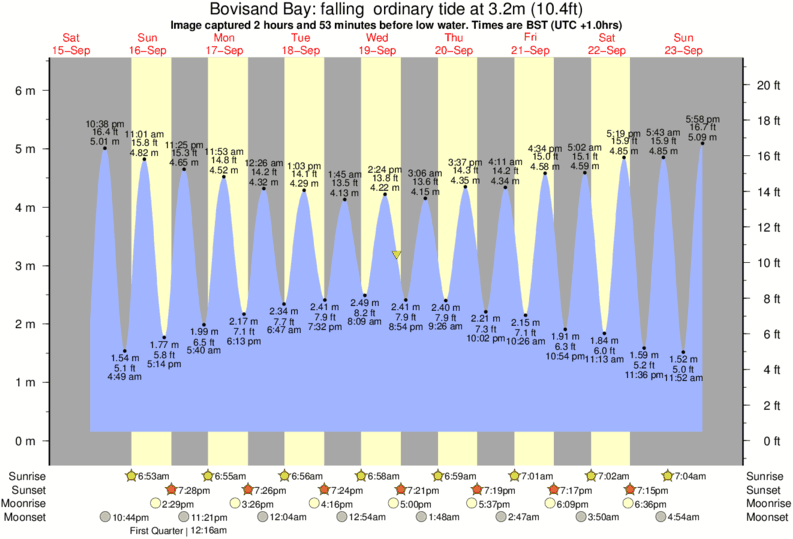
Image captured 2 hours and 53 minutes before low water (falling ordinary tide). Tide height was 3.2m (10.4 ft). Range 5.82m (19.1 ft). Toggle tide graph

Bovisand Bay Surf Photo: 'Bovisand bay' by Paul
Bovisand bay
 Nearest